You spot a steady stream of ants marching across the kitchen counter, and then you notice a tiny pile of sawdust under the baseboard. Before long, the problem grows—ants on the bathroom sink and faint rustling behind a wall. When ants set up shop inside your walls, they can be hard to find and even harder to get rid of.
An ant nest in walls is more than just a nuisance; it can be a threat to your home’s structural integrity and your family’s comfort. This guide walks U.S. homeowners through proven ways to locate a hidden ant nest, choose the safest elimination method, and stop ants from coming back. Whether you prefer DIY pest control or need to know when to call in the cavalry, you’ll find practical, step-by-step guidance here. We’ll also cover crucial safety tips for homes with kids and pets, ensuring your ant removal strategy is as safe as it is effective.
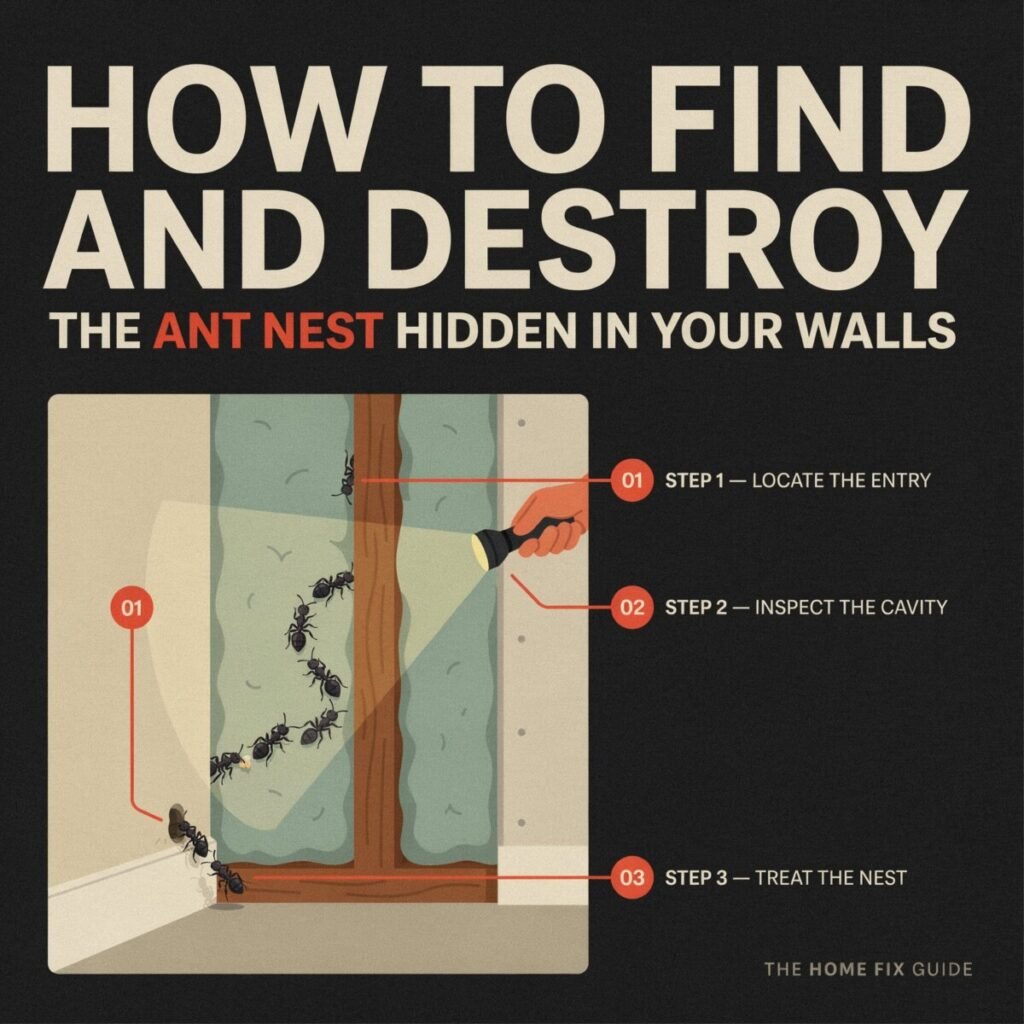
Quick Summary: Your Ant Inspection Checklist
Short on time? Here is the quick summary of the steps we will cover to help you find ant nest in walls and eliminate the colony:
- Inspect: Look for trails, frass, and moisture stains.
- Identify: Determine the ant species to choose the right bait.
- Locate: Use tracking powder and audio tools to pinpoint the nest.
- Choose a Method: Decide between baits, dusts, or natural remedies.
- Apply Treatment: Safely deploy your chosen ant bait or dust.
- Monitor: Watch for decreased traffic over 2–4 weeks.
- Prevent: Seal entry points and eliminate moisture sources.
Why Ants Build Nests in Walls
To effectively destroy ant nest in walls, you first need to understand why they chose your home in the first place. Walls offer an ideal microclimate for an ant colony. They provide dark, undisturbed cavity spaces that protect the queen and brood from predators and harsh weather.
In the United States, seasonal ant problems often drive these insects indoors. During the sweltering summers of the South or the freezing winters of the Midwest, ants seek temperature-controlled environments. Furthermore, walls often harbor hidden moisture. Leaky pipes, condensation from HVAC units, and poor exterior ventilation create damp wood and drywall, which are massive attractants.
Typical U.S. hotspots for ants in walls include kitchens and bathrooms (due to plumbing), basements, and attics. Carpenter ants, in particular, are notorious for nesting in walls where moisture and ants intersect, as they require damp, softened wood to excavate their galleries.
How to Identify Signs of an Ant Nest in Walls
Spotting a few ants in house spaces doesn’t always mean the nest is inside your walls; they could just be foraging from an outdoor mound. However, there are concrete signs of ants in walls that indicate a hidden satellite colony or primary nest:
- Constant Ant Trails: If you see a steady, unbroken line of ants emerging from a single crack in the baseboard, an electrical outlet, or a window frame, the nest is likely nearby.
- Hollow or Rustling Sounds: In quiet rooms at night, you might hear a faint crinkling or rustling sound. This is the noise of thousands of ants moving, grooming, and excavating inside the drywall or wood studs.
- Sawdust-Like Frass: If you spot small piles of what looks like sawdust or pencil shavings near baseboards, you likely have carpenter ants. This debris, called frass, is pushed out of their nesting galleries.
- Discolored Drywall or Paint: Moisture buildup from an ant nest, or the sheer volume of insects, can cause paint to bubble or drywall to stain yellow or brown.
- Musty Odors: Certain species, like odorous house ants, emit a distinct smell resembling rotten coconut or musty dampness when crushed or when the colony is large and active behind a wall.
Diagnostic Tip: Document your findings. Take photos of frass piles, trail entry points, and moisture stains. This visual inspection checklist will be invaluable if you eventually need to show the evidence to a professional exterminator.
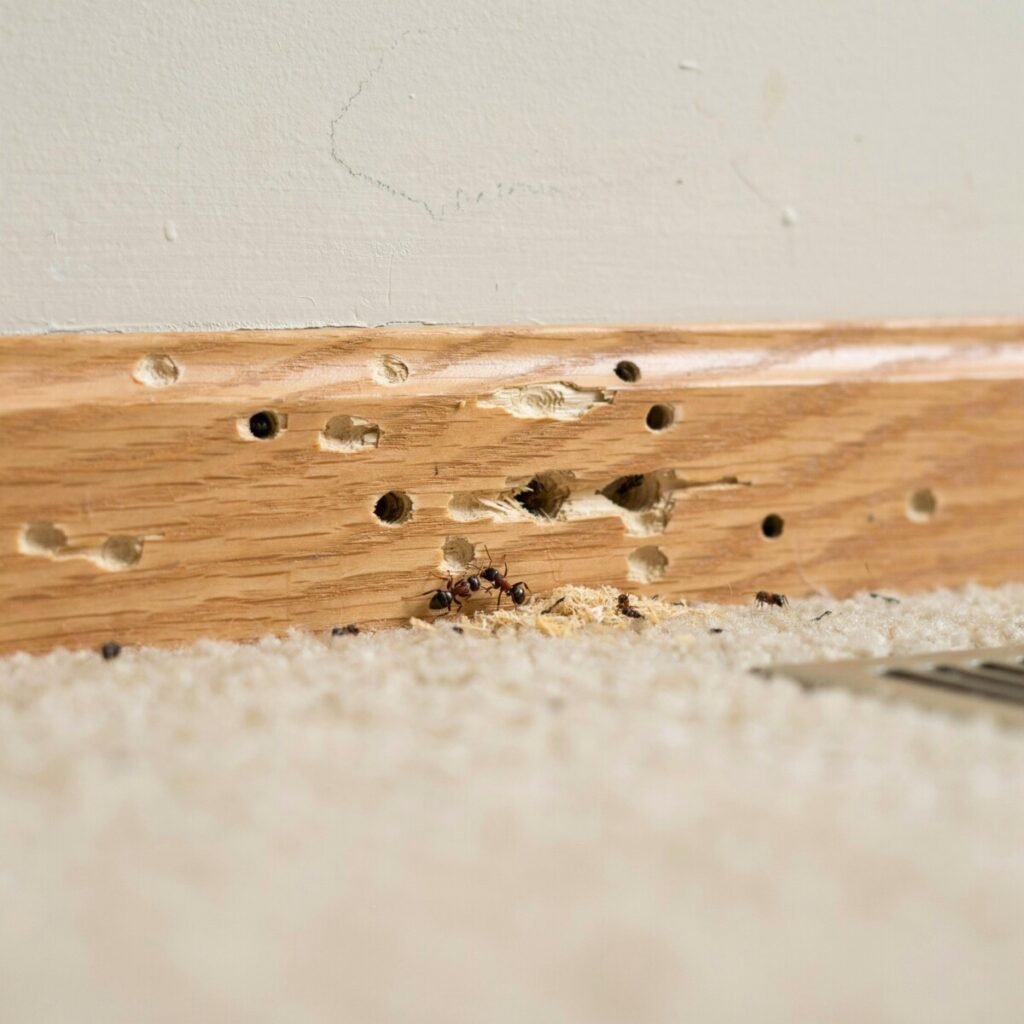
Identify the Ant Type — Why Species Matters
Not all ant infestation scenarios require the same treatment. Identifying the species is critical for successful ant removal:
- Carpenter Ants (Camponotus): Large (1/4 to 1/2 inch), usually black or reddish-black. They don’t eat wood; they excavate it to build nests, causing severe structural damage. They require specialized dusts and moisture control.
- Odorous House Ants (Tapinoma sessile): Tiny, dark brown to black ants. When crushed, they smell like rotten coconuts. They are highly adaptable, often forming massive super-colonies inside wall voids near heat sources.
- Pavement Ants (Tetramorium caespitum): Small, dark ants with pale legs. They usually nest outdoors under slabs but will enter homes through foundation cracks to forage for grease and sweets.
- Fire Ants (Solenopsis): Aggressive, reddish-brown ants primarily found in the Southern U.S. While they prefer outdoor mounds, they can enter wall cavities during floods. They pose a severe medical risk due to painful, venomous stings.
Knowing your enemy dictates your strategy. For instance, spraying a repellent on odorous house ants will only cause the colony to “bud” and split into multiple new nests inside your walls, making the problem exponentially worse.
How to Locate the Nest Inside Walls — Step-by-Step
Finding the exact location of the nest is the most challenging part of DIY pest control. Follow these steps to track them down:
1. Follow the Nighttime Trails
Ants are often more active at night. Turn off the lights, wait an hour, and use a flashlight to inspect baseboards and countertops. Follow the ant trails backward from the food source to the exact crack or crevice where they are entering the wall.
2. The Talcum Powder Trick
If trails are sparse, draw a line of talcum powder or chalk across a suspected pathway. Ants dislike crossing certain powders, or they will leave tiny, visible footprints through the dust, helping you confirm high-traffic zones and entry points.
3. Inspect Voids and Gaps
Use your flashlight to look behind the refrigerator, dishwasher, and inside dark cabinets. Pay close attention to gaps around plumbing pipes under sinks, electrical outlets, and HVAC vents. These are the superhighways ants use to navigate your home’s framing.
4. Listen and Measure
- Audio Detection: Use a mechanic’s stethoscope or a stud-finder with a live-sound function. Press it against the drywall and listen for the tell-tale rustling of an ant colony.
- Moisture Meter: Run a non-invasive moisture meter over the drywall. Because moisture and ants go hand-in-hand, a spike in moisture readings often pinpoints the exact location of a carpenter ant nest or a leaky pipe attracting them.
- Thermal Imaging: For advanced DIYers, renting a thermal imaging camera can reveal “hot spots.” The collective body heat and metabolic activity of a large nest will show up as a warm anomaly on the camera compared to the cooler surrounding wall cavity.
5. Exploratory Removal (Last Resort)
If all else fails, you may need to carefully cut a small inspection hole in the drywall or remove a section of baseboard.
⚠️ SAFETY WARNING: Before cutting into or drilling any wall, use a high-quality stud and wire detector to ensure you are not slicing into live electrical wiring, gas lines, or plumbing. If you are unsure, stop immediately and call a professional.
DIY Methods to Destroy an Ant Nest in Walls
Once you have located the nest or the primary entry points, it is time to destroy ant nest in walls. Here are the most effective methods, prioritizing child-safe ant control and pet-safe pest control.
Baiting (The Recommended First-Line Defense)
The most effective way to eliminate a colony hidden deep inside a wall is to let the ants do the work for you. Slow-acting ant bait (available in sugar-based or protein-based gels) is carried by worker ants back to the nest and shared with the queen through a process called trophallaxis.
- How to use: Place small dots of commercial gel bait or bait stations directly next to the ant trails and entry points.
- Crucial Tip: Do not kill the foraging ants or clean the trail with bleach. You need them alive to carry the poison home. Remove competing food sources (like pet food or sticky spills) so the bait is their only option. Boric acid for ants is a common active ingredient in these baits and is highly effective when used correctly.
Non-Toxic and Natural Ant Remedies
- Diatomaceous Earth (DE): Food-grade DE is a fine powder made from fossilized algae. It works by desiccating (drying out) the ants’ exoskeletons. Using a bulb duster, you can puff DE into wall voids through electrical outlet gaps (ensure the power is turned off first) or behind baseboards. It is an excellent, low-toxicity option for pet-safe pest control, though it takes a few days to work and must remain dry to be effective.
- Soap and Water Sprays: A simple mixture of dish soap and water in a spray bottle will kill ants on contact by breaking down their protective waxy coating. However, this is only a quick knockdown for visible trails and will not eliminate the hidden queen.
- A Note on Boiling Water: While pouring boiling water into an outdoor ant mound is a common folk remedy, never pour boiling water into your walls. It will ruin your drywall, warp wood studs, and create severe electrical and mold hazards.
Direct Contact Treatments (Dusts and Aerosols)
If you have confirmed the nest location inside a wall void and have safe access (such as through a removed switch plate), residual insecticide dusts (like DeltaDust or Cimexa) can be highly effective.
- Application: Use a specialized bellows hand duster to apply a very light coating of dust into the void. If you apply too much, ants will simply walk around the pile.
- Safety Gear: Always wear an N95 mask, safety goggles, and nitrile gloves when applying dusts. Keep children and pets out of the room until the dust has settled and the area is ventilated.
DIY Tools Checklist: Gel bait stations, boric acid gel, food-grade DE, bulb/bellows dust applicator, flashlight, N95 mask, and nitrile gloves.
When to Call a Professional Exterminator
While DIY pest control is great for minor foraging trails, some situations demand a professional exterminator. You should hire a licensed pro if:
- You suspect carpenter ants are causing structural damage to your home’s framing.
- The infestation is massive, persistent, or spreading to multiple rooms despite your best baiting efforts.
- You are dealing with dangerous species like fire ants indoors.
- The nest is located near complex electrical panels or main plumbing lines where DIY drilling is unsafe.
- You prefer not to handle chemicals or lack the time for the rigorous monitoring required.
What to expect: A reputable pro will perform a thorough inspection, identify the species, and utilize commercial-grade baits and micro-encapsulated dusts that are not available over the counter.
Pro Tip: When hiring, get 2–3 quotes. Ask specifically about their approach to integrated pest management (IPM). IPM focuses on long-term prevention and uses chemicals only as a last resort, ensuring the safest environment for your family. Always verify their state licensing and read reviews.
Preventing Re-Infestation
Destroying the nest is only half the battle. To ensure you don’t end up with another ant infestation next season, you must make your home inhospitable to them.
- Seal Entry Points: Use high-quality silicone caulk to seal gaps around plumbing pipes, exterior vents, doors, and windows. Sealing gaps denies ants the highways they use to enter your home.
- Fix Moisture Problems: Repair leaky faucets, replace water-damaged drywall, and ensure your bathroom exhaust fans are venting properly. Consider using a dehumidifier in damp basements or crawlspaces. [Internal Link Suggestion: Link to “How to Fix Moisture Problems in Basements”]
- Landscape Maintenance: Keep mulch piles at least 12 inches away from your foundation. Store firewood off the ground and away from the house—firewood is a notorious Trojan horse for carpenter ants. Trim tree branches and shrubs so they do not touch your siding, removing the “bridges” ants use to bypass your perimeter defenses.
- Sanitation: Wipe down counters with a vinegar-water solution to destroy pheromone trails. Store pantry goods in airtight glass or hard plastic containers, and never leave pet food out overnight.
- Scheduled Monitoring: Make it a habit to check baseboards, attic eaves, and crawlspaces seasonally, especially during the spring swarm season.
Safety, Legal, and Environmental Notes
When engaging in ant removal, safety and legality must come first. Always read and follow the manufacturer’s label on any pesticide; under U.S. federal law (FIFRA), using a product in a manner inconsistent with its label is a violation.
Look for EPA-registered products and be aware of your local state regulations. States like California and New York have strict laws regarding which active ingredients can be used indoors and how they must be disposed of. Never pour leftover liquid pesticides down the drain or storm sewer, as this contaminates local waterways. If your ant problem requires cutting into walls to repair structural damage, ensure your contractor pulls the necessary permits and adheres to local building codes to maintain your home’s safety and resale value.
Quick Troubleshooting FAQ
Q: I put out bait, but the ants are ignoring it. Why?
A: Ant colonies have shifting dietary needs based on their life cycle. If they are ignoring a sweet (sugar-based) bait, they may currently need protein to feed their larvae. Switch to a protein-based bait. Also, ensure you haven’t used a harsh chemical spray nearby, which will repel them from the bait.
Q: Are ants helpful in any way?
A: Outdoors, ants are vital for soil aeration and pest control. But indoors, an ant colony is strictly a pest that poses risks to sanitation and, in the case of carpenter ants, your home’s structure.
Q: How long until the ants are completely gone?
A: When using slow-acting baits, it typically takes 2 to 6 weeks to fully collapse a large colony hidden in a wall. Patience is key.
Q: Will one treatment fix carpenter ants?
A: Rarely. Carpenter ants often have a primary outdoor nest and multiple satellite nests indoors. You must fix the moisture issue and replace the damaged wood, or they will return.
Pro Tip: Rotate your bait types every few months if you use preventative stations, and keep a log of where you’ve seen activity to track seasonal patterns.
[Internal Link Suggestion: Link to “Signs of Termites vs Carpenter Ants”]
Call to Action and Resources
Don’t let a hidden colony compromise your home’s peace and structure. Grab your flashlight, try the inspection checklist below, and choose a safe, targeted treatment to reclaim your walls. If the damage is extensive or the colony is out of control, reach out to a local, licensed IPM-certified exterminator today.
Authoritative Resources for U.S. Homeowners:
- EPA: Pesticide Use and Safety Basics
- UC Statewide Integrated Pest Management Program (UC IPM)
- Penn State Extension: Household Ants
🎁 Bonus:
The Homeowner’s Hidden Ant Nest Inspection Checklist
Date: Room(s) Inspected:
1. Visual Trail Inspection (Nighttime Recommended)
- [ ] Checked kitchen counters, sinks, and baseboards.
- [ ] Checked bathroom vanities and tub surrounds.
- [ ] Checked behind major appliances (fridge, dishwasher, stove).
- [ ] Checked inside dark cabinets and pantry corners.
- Note entry points on a rough sketch of the room.
2. Signs of Damage & Nesting
- [ ] Inspected baseboards for “frass” (sawdust-like debris).
- [ ] Checked drywall for bubbling paint, yellow stains, or moisture.
- [ ] Tapped on wood trim and drywall—listened for hollow sounds or rustling.
- [ ] Smelled for musty/rotten coconut odors near wall voids.
3. Moisture & Entry Point Audit
- [ ] Felt under sink pipes for condensation or leaks.
- [ ] Checked window sills for water damage or rot.
- [ ] Inspected exterior foundation for mulch-to-siding contact.
- [ ] Identified unsealed gaps around plumbing/electrical penetrations.
4. Action Plan
- [ ] Species identified: ___
- [ ] Treatment chosen: [ ] Bait [ ] Dust [ ] Professional Call
- [ ] Competing food sources removed & sealed.
- [ ] Follow-up monitoring date set for: _